Sunday, January 24, 2010

Graphical LCD Display:


An accurate and simple graphical oscilloscope using a PIC18F2550 microcontroller and an AGM1264F graphical LCD has been constructed using the PIC18F2550 GLCD Text Test as basis. It has the capability of measuring the maximum voltage, peak-to-peak voltage, average voltage, minimum voltage, and the zero-crossing frequency for a DC signal over 100 samples. To capture on rise or fall, the oscilloscope has a built-in edge trigger function that can be set.

Using the change Time Division function, the time scale for the display is variable and can be easily redefined while the voltage range can be changed to 0-5V, 0-2.5V, and 0-1.25V. The relatively slow acquisition time and sampling rate is the main limitations of this oscilloscope due to the fact that the inputs are limited by the constraints of the internal ADC.
A 9V battery is used as the power supply along with a high-accuracy low drop-out linear voltage regulator to provide a stable 5V supply for the microcontroller and the graphical LCD. The power spikes/ripples are prevented by capacitor.

Robot Navigation System


Robot Navigation is a large component of current robotics research. In this paper, a method to implement the “go-to-goal” aspect of navigation is discussed. Specifically, I will first discuss a method called Egocentric Navigation, which was developed at Vanderbilt University’s Center for Intelligent Systems. Then improvements toward making the system more accurate and efficient will be proposed. Finally, the experimental and simulation results of this new Egocentric Navigational system follow. In total, this paper will lay out a complete system for implementation on a robot which will accomplish navigation to goal in a landmark-based “egocentric” manner.

Tuesday, January 19, 2010

Fireflies With Small Microcontrollers

This circuit simulates fireflies with small microcontrollers. Here is the circuit and the component used for single fireflies


  1. ATtiny13 microcontroller
  2. Light Dependant Resistor (LDR)
  3. LED
  4. 2 resistors
To make it interesting, assembly it on the board for 25 fireflies. Every single firefly is self contained, there is no over-all controller. Here is the picture

Sunday, January 17, 2010

Interfacing an AVR controller to a GPS Mobile Phone


So my first idea was to combine a microcontroller with a GSM and a GPS modul. There are a lot of these modules over at Sparkfun, for example. Looking through their shop I found the Telit GM862, which is a GSM modul with an built in GPS receiver. That is what I wanted. And they sell great break out boards to make it easier for hobbyist to access these modules.

Here are some of the features of this GSM-GPS module:
  • Quad band GSM
  • 17mA average stand-by, 3.5mA in low-power mode
  • 250mA average operating current
  • SiRF III GPS Receiver Built In
  • Data, Voice, SMS, and Fax
  • Data speeds up to 57.6kbps
  • Supply voltage : 3.4-4.2V
  • CMOS Camera Capable
  • Python Interpreter built-in

Voice means you are not limited to mobile tracker applications. You could attach a speaker and a microphone to build a complete mobile phone!

Ultrasonic Spotlight Tracker

Ultrasonic Spotlight Tracker
The ultrasonic spotlight tracker is a system that uses a wireless beacon to track a target’s location using both RF signals and ultrasound waves. It then drives a light source to point at the location of the target.
In this project, we limit our remote unit’s degree of freedom to two dimensions to prove the concept, although it can be very easily extended to three dimensions. To locate the target, we need to measure the distance of the target from at least two known points. The distances are measured by counting the time it takes for sound to travel from the target to the base station and multiplying it by the speed of sound waves. The speed of sound in air is about 334 meters per second. The 16 MHz microcontroller avr can count time intervals on the order of 0.0625 microseconds, which gives a theoretical accuracy of 0.02 mm.

Saturday, January 16, 2010

Inex Interactive C Robot Kit

High performance C programmed robot kit

For power hungry hobbyists

Perfect for students, or anyone looking for an easy to build robot that is programmed in C

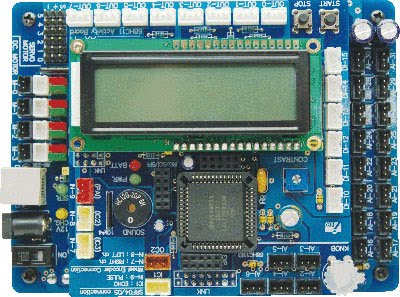
The Inex Interactive C Robot Kit V2.0 includes the AX-11, a 68HC11 based microcontroller board, an assortment of great sensors, 2 DC gearboxes and mechanical parts for building and modifying 8 sample robot projects (see manual below).

The AX-11 microcontroller boardThe AX-11 microcontroller board

The AX-11 microcontroller board is a modified version of the popular Handy board from MIT. The AX-11 is a microcontroller system that is used to run robot design courses and competitions at the university and high school level, build robots for fun, and control industrial devices. This board uses the 68HC11 microcontroller and has 32KB non-volatile RAM, 9-digital inputs , 21-channels 8-bit ADC, 4-DC motor driver, 6-Servo motor driver, a 16x2 LCD module for display and an infrared LED with 38kHz IR module. Data can be downloaded from your PC via its RS-232 port.

The Inex Interactive C Robot Kit is programmed in C. The Interactive C environment consists of a compiler (with interactive command-line compilation and debugging) and a run-time machine language module. It has many functions and libraries to directly support robot programming.

Includes

  • Controlled by 68HC11 Microcontroller
  • 32KB non-volatile RAM
  • Serial port interface
  • LCD 16x2 display
  • Piezo speaker
  • Ability to drive 4-DC motors (2 gearmotors are included)
  • 6-Servo motor ports (servo motors sold separately)
  • 6-Digital inputs
  • 8-Digital outputs
  • 21-Analog inputs
  • 12V Power Supply (included)
  • 6xAA battery holder
  • Sensors (GP2D120 IR ranger, 2 wheel encoders)

This kit comes complete with Thai manuals (English manual can be found below) and CAI software for learning to program the robot. Everything you need to successfully build your robot is provided.

The manual includes instructions on using a SFR04 ultrasonic rangefinder (RB-Dev-01), IR proximity sensors (RB-Lyn-02) and the CMPS03 magnetic compass (RB-Dev-03) which can easily be interfaced with the Interactive C Robot (sold separately). Add any of our sensors and increase its awareness!

Friday, January 8, 2010

Controlling AVR with Visual Basic

Controlling AVR with Visual BasicControlling AVR with Visual Basic

The purpose of this microcontroller project is to give the student a figure out about How to Control AVR Devices using Visual Basic (PC). To comunnicate between PC and Microcontrller, it use RS232. So, this is not a stand alone project. From this general microcontroller project the student can improve and made more specific to meet their requirement. This project creted by Serasidis

"The use-range of this application is very high. You can make, anything you want, that its need control from PC computer or some circuit that is collect data from somewere, and at the end, its give this data to PC computer via RS232 port to our software"

NiCd/NiMH Battery Charger

NiCd/NiMH Battery ChargerNiCd/NiMH Battery Charger

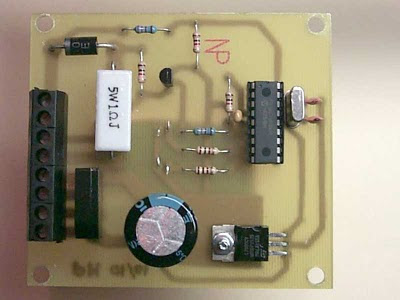
Commercial NiCd/NiMH Battery Charger, As you may have noticed, are not that Efficient when it comes to charging time. There might be some expensive models but we are not referring to that. One of the solution is using Intelligent NiCd/NiMH Battery Charger created by Peter Hayles. This Efficient NiCd/NiMH Battery Charger build using microcontroller PIC 16C711. Because it will reduce the complexity of the circuit. He says that with the DIY charger he managed to cut the charging time from 4 hours to 1.5 hours max. This sound good to me.

"This cheap and easy to build NiCd/NiMH Battery Charger is suitable for automatically charging a wide range of batteries for many applications. Proper chargers are usually expensive and cheap chargers supplied with the original equipment often incorrectly charge the cells and dramatically shorten their life. This 'intelligent' charger was designed for high current and rapid charge applications such as cordless power tools and model racing cars."

Thursday, January 7, 2010

Digital Camera Interface

Digital Camera InterfaceDigital Camera Interface

How to interface CMOS camera and microcontroller? well, IƱaki Navarro Oiza had made great microcontroller project about it. The camera called c3088 uses a CMOS image sensor OV6620 from Omnivision. To communicate between microcontroller and camera he use I2C protocol. As processor it used Atmel AVR ATmega16.

"The aim of this project is the development and construction of an interface between a CMOS camera and a computer. This interface allows a user to get images from the camera, to change some of the properties of the camera as brightness, luminance, etc from a computer. Also some image process is implemented allowing the camera to track white objects and follow them with a servomotor. The interface was implemented using the Atmel AVR ATmega16 microcontroller."

Data Acquisition & Logging System

Data Acquisition & Logging SystemData Acquisition & Logging System

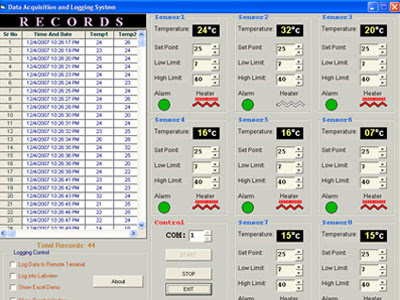
This microcontroller project log the temperature system. It can be used to monitoring and controlling environment temperature as we needed. i know that the chip, AT89C51, little out of date, but at least we can still learn the system How to make Data Acquisition & Logging System with microcontroller. This great project made by Abbas Raza

"The status and temperature date saved to PC via serial communication. Here 8 temperature sensors are connected(4 shown in diagram for simplicity). values of all the sensors are sent serially by AT89C51 to pc. Software "DAQ System " takes these values and show them on its front panel, and also logs them to the data base "daq.mdb" .we can set some parameters like set point , low limit ,and high limit . when temperature of some sensor increases beyond set point ,the heater connected to controller (specific for that sensor) will be turned OFF( ON in opposite case ).High limit and low limits are for alarm. when temperature goes above high limit or below low limit the alarm will be turned on."

Wednesday, January 6, 2010

USB AVR Programmer

USB AVR Programmer

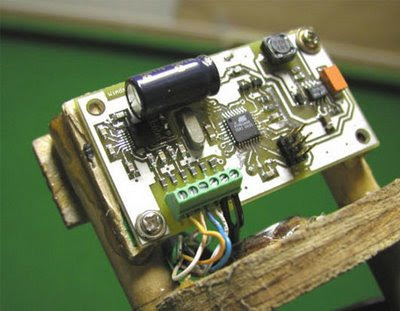
Serasidis says "Nowadays, USB is the most popular connection connection between PC and peripherals such as AVR programmers, printers, scanners etc. For that reason I had to modify my old serial AVR In-System-Programmer (ISP) to work with USB connection. You can say, "use a USB to Serial adaptor to connect your AVR ISP with your PC". Yes, that could be a solution but it would cost me more money than a singe FT232BM chip because I had to include an USB to RS232 adaptor and a power supply for my programmer. (almost €30)".

So, the solution was to replace the two transistors, that were used to adapt the RS-232 voltage levels to TTL voltage levels, with a USB to RS-232 chip such as FT-232BM.

Small TV Terminal AVR Project

Small TV Terminal AVR ProjectSmall TV Terminal AVR Project

When you use microcontrollers in your designs, sometime you face a problem how to show user required data. Several LEDs, 7 segment display or LCD module can be solution. But if you must show a lot of information simultaneously, it can be difficulty. Large LCD modules are expensive and graphic modules require complicated control. You can solve it with a help of PC. Just send data via serial line to the computer and display everything on computer's display said Vassilis Serasidis.

Tuesday, January 5, 2010

Windmeter using Microcontroller

Windmeter using MicrocontrollerWindmeter using Microcontroller

The Windmeter is an anemometer designed to measure and record wind speed distribution from 0 to 17+ meters per second. It was designed for high reliability, ease of construction, and for a wide environmental range. Data is logged over a period of 30.46 days (1/12 of a year), and then saved for 11 months. The data can be retrieved with a laptop computer any time within the 12 months of logging. The Windmeter is self-powered by a solar pannel and battery. Calibration of the Windmeter can be done against a car's speedometer or better yet a GPS receiver. The Windmeter should cost you under $300 to make.

Flickr Images on A Nokia LCD and AVR

Flickr Images on A Nokia LCD and AVRFlickr Images on A Nokia LCD and AVR

Another electronic project related to LCD. Alex has created microcontroller project : Flickr images on a Nokia LCD. The "brain" used microcontroller AVR ATmega48 and the software, he decided to fetch images from Flickr using Beej’s Python Flickr API.
Is it difficult to bulid this cool microcontroller project? well, if you follow what alex said i'm sure you can do it. May be i'll built it someday